Friday, 13 January 2023

How to Find Virus On Windows


How to Check if a Process Is a Virus or Not

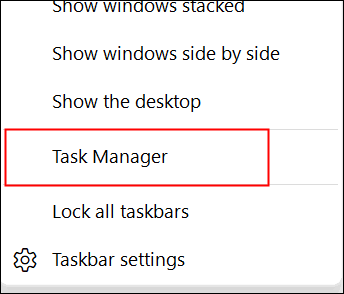
You might be wondering if your computer has a virus because you’ve seen a strange process in the Windows Task Manager, which you can open by pressing Ctrl+Shift+Esc or by right-clicking the Windows taskbar and selecting “Task Manager.”


It’s normal to see  a few processes here — click “More Details” if you see a smaller list. Many of these processes have strange, confusing names. That’s normal. Windows includes quite a few background processes, your PC manufacturer added some, and applications you install often add them.

Windows 10's Task Manager showing running processes.Badly behaved malware will often use a large amount of CPU, memory, or disk resources and may stand out here. If you’re curious about whether a specific program is malicious, right-click it in the Task Manager and select “Search Online” to find more information.

If information about malware appears when you search the process, that’s a sign you likely have malware. However, don’t assume that your computer is virus-free just because a process looks legitimate. A process could lie and say it’s “Google Chrome” or “chrome.exe,” but it may just be malware impersonating Google Chrome that’s located in a different folder on your system. If you’re concerned you might have malware, we recommend performing an anti-malware scan.

Searching for a process's name online from the Windows Task Manager.


How to Scan Your Computer for Viruses

By default, Windows 11 is always scanning your PC for malware with the integrated Windows Security application, also known as Microsoft Defender. You can, however, perform manual scans.

On Windows 10 or 11, open your Start menu, type “Security,” and click the “Windows Security” shortcut to open it. You can also head to Settings > Update & Security > Windows Security > Open Windows Security on Windows 10, or Settings > Privacy and Security > Windows Security > Open Windows  on Windows 11.

Opening the Windows Security application from Windows 10's Settings.

To perform an anti-malware scan, click “Virus & threat protection.”

Opening the Virus & threat protection settings in Windows Security.Click “Quick Scan” to scan your system for malware. Microsoft Defender will perform a scan and give you the results. If any malware is found, it will offer to remove it from your PC automatically.

Click “Quick Scan” to scan your system for malware. Microsoft Defender will perform a scan and give you the results. If any malware is found, it will offer to remove it from your PC automatically.

Manually scanning for viruses and other malware in Windows Security.

If you want a second opinion — always a good idea if you’re concerned you might have malware, and your primary antivirus doesn’t find anything — you can perform a scan with a different security application, too.

We like and recommend Malwarebytes, which pairs well with Windows Security to provide an extra layer of protection for your PC. The free version of Malwarebytes will let you perform manual scans to check for viruses and other malware on your PC. The paid version adds real-time protection—but, if you’re just looking to test a computer for malware, the free version will work perfectly.
Click "Scan."


Wednesday, 11 January 2023

How to Create a Shutdown Button On window


How to Create a Shutdown Button for Windows

Resolution

Follow these steps to create a shutdown shortcut: 


1. Right click on the desktop and select the New > Shortcut option.
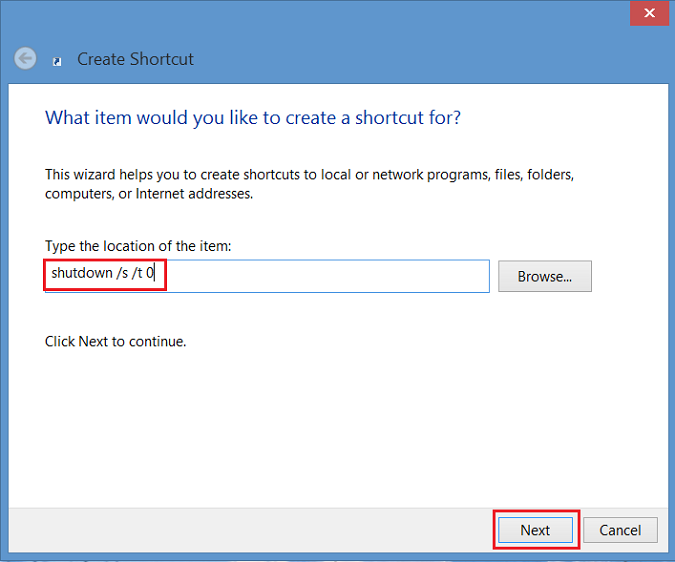
2. In the Create Shortcut window, enter "shutdown /s /t 0" as the location (Last character is a zero) , do not type the quotes (" "). After entering the location click on Next to go to the next step.

SLN288446_en_US__11389806833053.Shutdown1
Figure 1 - Create Shortcut window

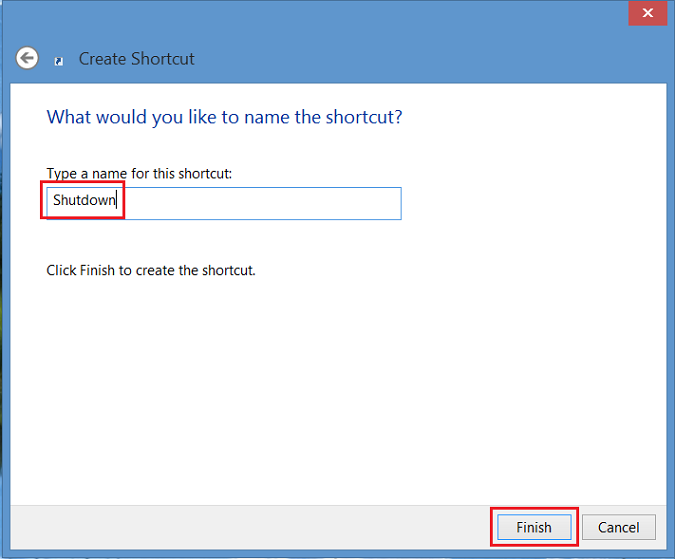
3. Now enter a name for the shortcut. In this example, "Shutdown" was used. Click Finish. A shortcut will appear on your Windows 8 desktop.
SLN288446_en_US__21389806881163.Shutdown2
Figure 2 - enter a name for the shortcut

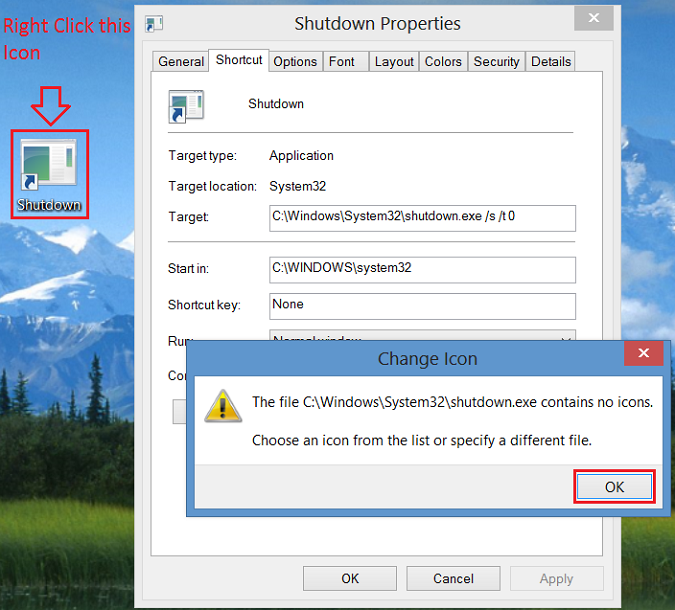
4.Right click on the new shutdown icon, select Properties and a dialogue box will appear. This dialogue box will give you a notification that this shortcut doesn’t have an icon. Click Change Icon, then click on OK to add the Icon.
SLN288446_en_US__31389806929414.Shutdown3
Figure 3 - Right click on the new shutdown icon

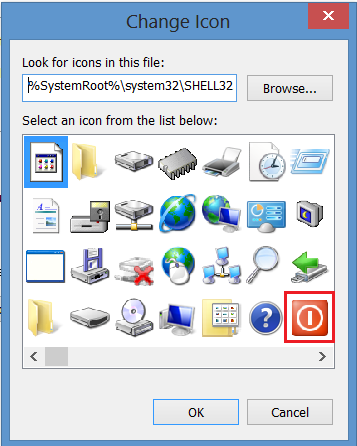
5. Now click on Change Icon button and select the Power Button icon. After selecting, click twice on OK to save the change.
SLN288446_en_US__41389806967945.Shutdown4
Figure 4 - Change Icon

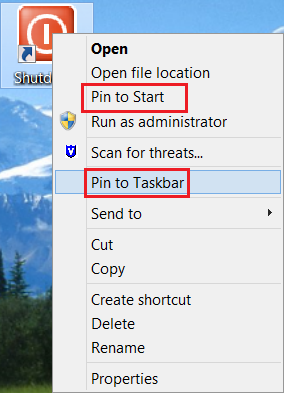
6. A shutdown button shortcut will now appear on your desktop. Right click on it and choose Pin to Start and/or Pin to Taskbar to add to the task bar. You can also move the icon where you desire on the desktop.
  SLN288446_en_US__51389807199698.Shutdown5

How to Disable USB Port

6 Ways to Enable or Disable USB Drives or Ports in Windows

1. Enable/Disable USB ports using the Registry editor

USB ports can be enabled/disabled using the registry editor by following the steps mentioned below:

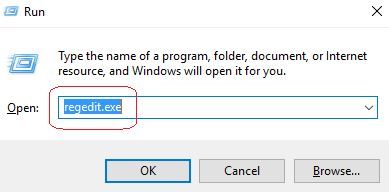
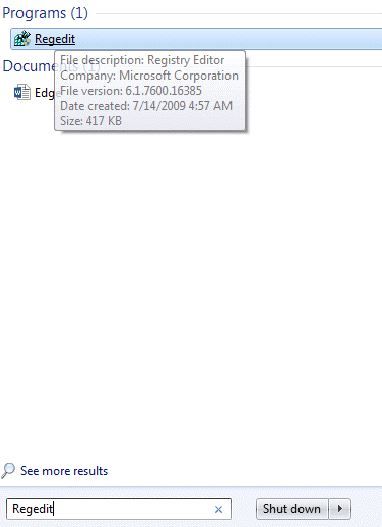
In the first step, you have to go to the Start menu and then open Run dialog box or Press "Window + R" combination to directly open the RUN window.

Then type "regedit.exe" and then click on enter to open the Registry Editor as shown in the figure below.

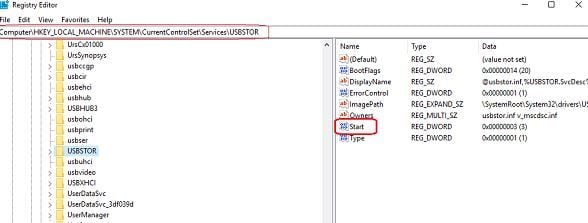
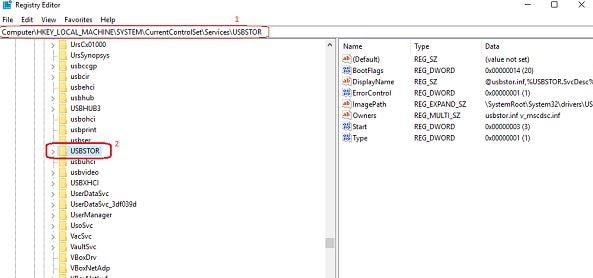
Run Dialog BoxRegistry Editor Window will be launched, now Navigate to the following path:

HKEY_LOCAL_MACHINE > SYSTEM > CurrentControlSet > Services > USBSTOR

registry editor window

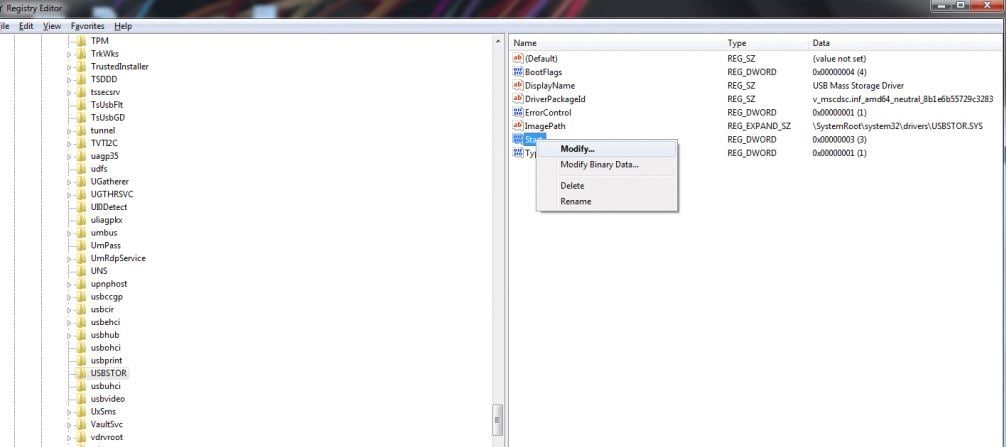
Now you have to click on the start option to open the "Edit DWORD (32-bit) Value" Window.

opening start file

After pressing Start, you have to change the "value data" field to ‘4’ to disable the USB Drives or Ports and then click on OK, as depicted in the figure below. Once done USB drives and ports on your system will be disabled.

change value data

To enable back the USB Ports or Drives, change this data value to 3 and then click on OK, as depicted in the figure below. Once done USB drives and ports on your system will be enabled back.

change value 3

You can restart your system to check the applied effects.

2. Enable/Disable USB Ports using Device Manager

You can also enable/disable your USB ports using the Device Manager.

  1. In the first step, you have to launch the Start menu and then type Device Manager. Click on Device Manager or open it using the shortcut keys combination "Windows + X", click on device manager
  2. Once the device manager is launched, you have to click on the Universal Serial Bus Controllers and there you will see different device options available in it as depicted in the figure below.

universal serial bus controllers

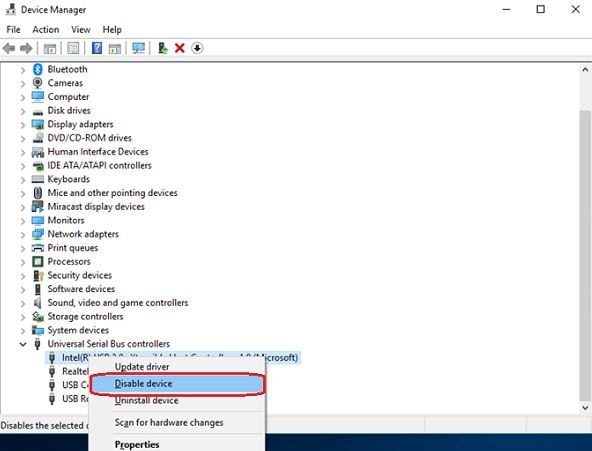
Right-click on the USB 3.0 (or any other mentioned device in your PC), and then click on Disable device to make the USB ports and drives disabled on your system., as depicted in the figure shown below.

disable device

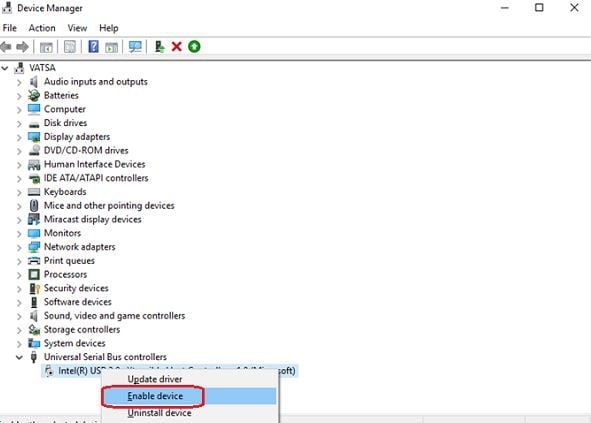
Right-click on the USB 3.0 (or any other mentioned device in your PC), and then click on Enable device to make the USB ports and drives enabled on your system., as depicted in the figure shown below.

3. Disable/Enable USB ports by uninstalling USB Mass Storage Drivers

A system can be protected from malicious users on a high scale like in school, office, etc., by uninstalling USB Mass Storage Drivers. You can just uninstall these drivers and when anyone would try to plug in the USB drive then Windows will prompt him/her to install the USB drivers. Later on, you can install the drivers back to make the things work (USB devices detected) again.

4. How Do I Enable USB Ports in BIOS

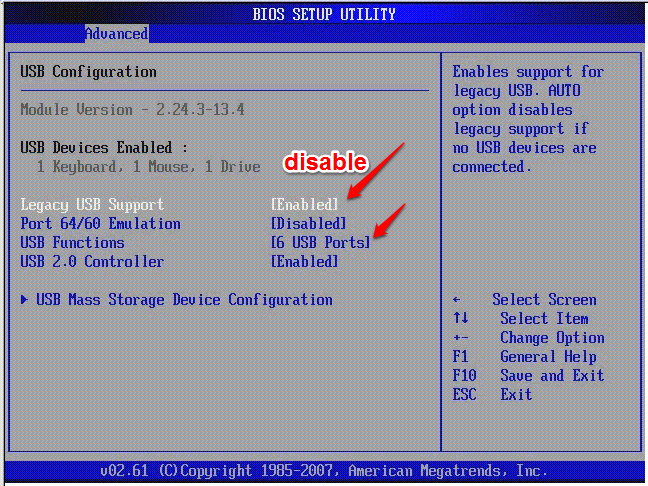
Some vendors provide an option in BIOS/UEFI to enable or disable the USB ports on the system. In other cases, you may also have accidentally disabled usb ports. Boot into the BIOS.UEFL to check if such an option or feature is available on your system. You can check the user manual of your PC to see if the feature to enable or disable the USB ports is available in the BIOS.

enable usb port in bios

5. Disallow Users to Connecting USB

Use one or more of the following methods to block users from connecting to USB storage devices, as appropriate for your case.

If there is no USB storage device already installed on your computer

If a USB storage device isn't already installed on the computer, assign Deny permissions to the following files to the user or group and the local SYSTEM account :

  • %SystemRoot%\Inf\Usbstor.pnf
  • %SystemRoot%\Inf\Usbstor.inf

Users can not install a USB storage device to the computer when you do this. To assign Deny permissions for the files Usbstor.pnf and Usbstor.inf to an individual or group, follow these steps:

  1. Start Windows Explorer and find the %SystemRoot%\Inf folder.
  2. Right-click on the file in Usbstor.pnf, then press Properties.
  3. Click on the Security tab.
  4. Add the user or group you want to set Deny permissions to in the Group or UserNames list.
  5. Click to pick the Reject checkbox next to Complete Access in the UserName or GroupName Permissions column.

Note In the Deny list, also add the System account.

  1. Select the SYSTEM account in the list of groups or Usernames.
  2. Click on the Deny check box next to Full Control in the UserName or GroupName Permissions list, and then click OK.
  3. Right-click file Usbstor.inf, then click on Properties.
  4. Click on the Security tab.
  5. Add the user or group you want to set Deny permissions to in the Group or User Names list.
  6. Click to pick the Reject checkbox next to Full Control in the UserName or GroupName Permissions list.
  7. Select the SYSTEM account in the list of Group or UserNames.
  8. Click on the Deny check box next to Full Control in the UserName or GroupName Permissions list, and then click OK.

6.  Disconnect USB

It is impossible to disconnect all the USB ports from the motherboard; all you can do is to disconnect those exist on the top and front of the computer by plugging out the cable from the USB header. Disconnecting these ports prevents people from miscuing them. You can disallow USB by changing group policies, third-party applications/tools are also available for disabling USB ports on Windows 10, i.e., SysTools USB blocker and USB block, etc.


How to Change the Microsoft Office Default Save Location


Changing the Microsoft Office Default Save Location


To change the default location for saved Microsoft 365 files, go into any of the Microsoft 365 apps installed on your PC, then do the following:

  1. Bring up the document you wish to save.
  2. Choose File.
  3. Click Options at the bottom left.
  4. Select Save.
  5. Check the box next to Save to Computer by Default under the Save Documents section.
  6. Add the Default local file location in the box provided. You can choose the Browse button.
  7. Click OK.

Your default save location has been changed for all of your Microsoft 365 files. From now on, when you want to save a file, it will default to your local drive.

Microsoft Office Default Save Location

Change Manual Location


You can still manually change the saved location for individual files. You can do so the first time you’re saving a document or subsequent times, depending on your preferences.

To manually change the save location for a document for the first time:

  1. Bring up the document you wish to save.
  2. Choose File.
  3. Select Save.
  4. Choose the location where you want to save the file.
  5. Click Save.

Microsoft Office Default Save Location

Subsequent saves for this file only will occur in the location mentioned above.

To save an existing file to a new location:

  1. Bring up the document you wish to save.
  2. Choose File.
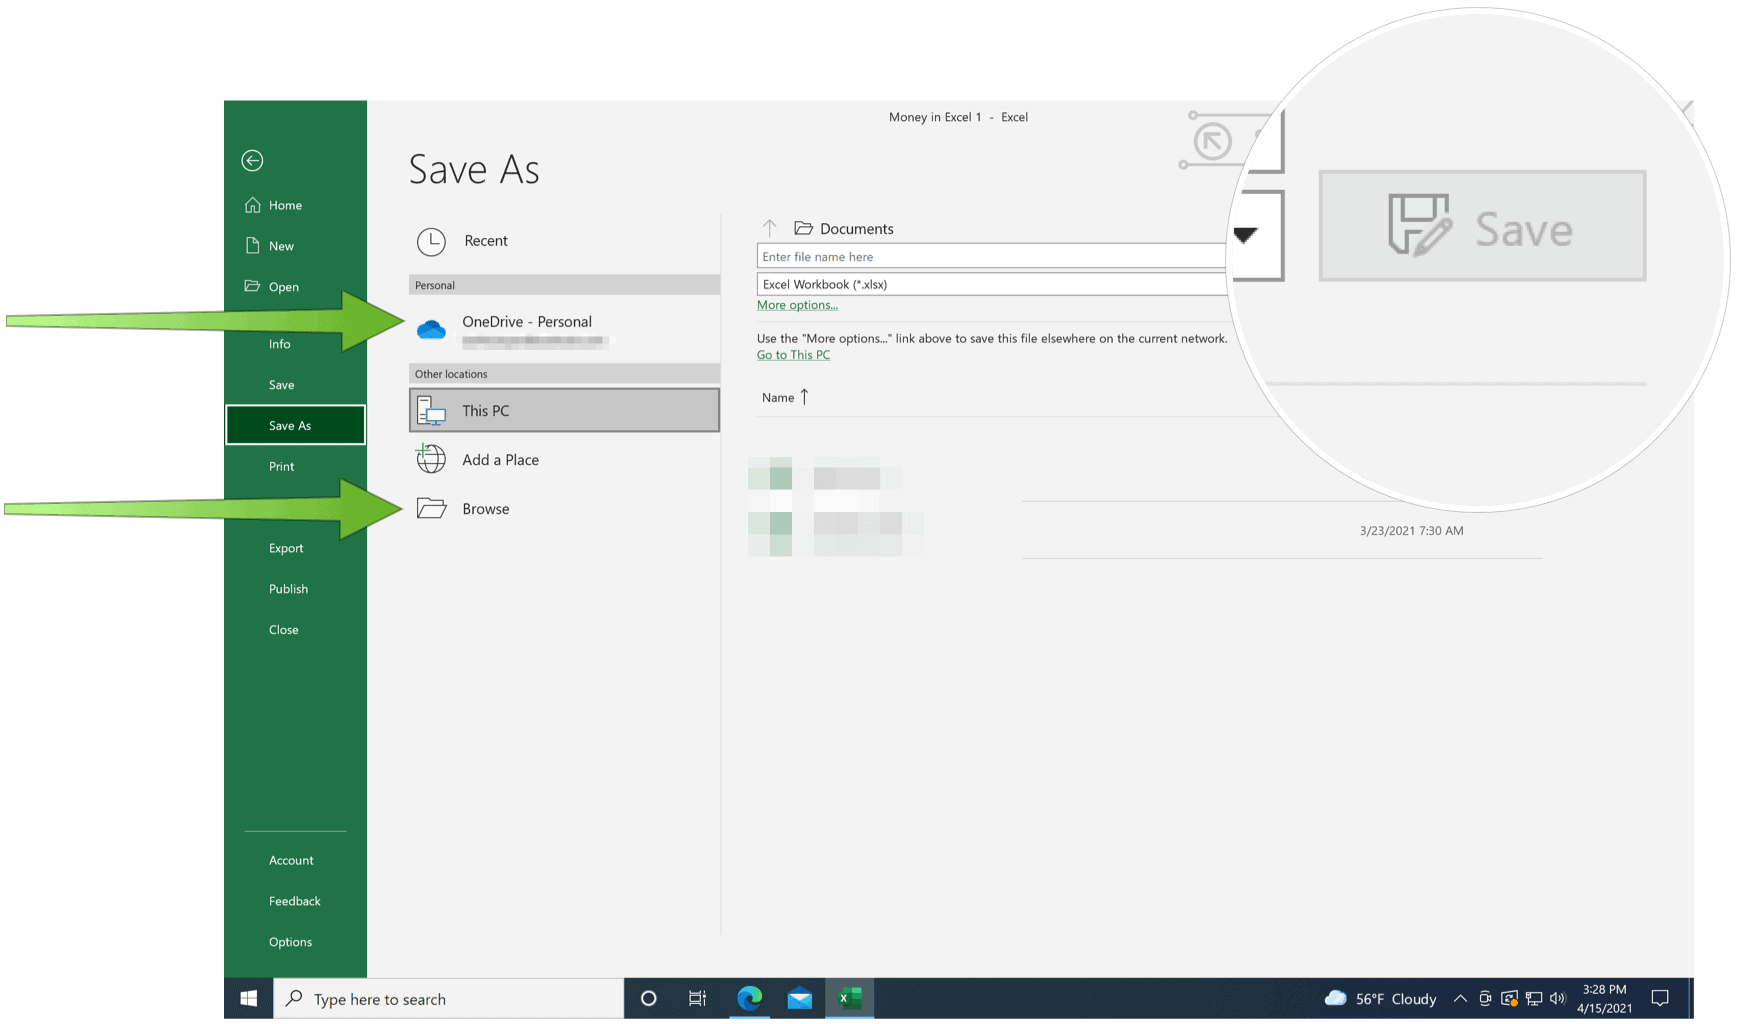
  3. Select Save As.
  4. Choose the location where you want to save the file.
  5. Click Save.

Microsoft Office Default Save Location


How to Stop Others From Changing Your Windows Desktop Background.


How to Prevent Others From Changing the Desktop Background

Here’s how you can restrict access to the desktop background settings using the LGPE:

  1. Use the Windows key + R keyboard shortcut to open the Run command.
  2. Type gpedit.msc and click OK to open the Local Group Policy Editor.
  3. Browse the following path:User Configuration > Administrative Templates > Control Panel > Personalization
  4. Double-click the Prevent changing desktop background policy.

  5. Select the Enabled option.

  6. Click Apply.
  7. Click OK.


Wednesday, 26 October 2022

.net core

.net core

NET Core Overview

.NET Core is a new version of .NET Framework, which is a free, open-source, general-purpose development platform maintained by Microsoft. It is a cross-platform framework that runs on Windows, macOS, and Linux operating systems.

.NET Core Framework can be used to build different types of applications such as mobile, desktop, web, cloud, IoT, machine learning, microservices, game, etc.

.NET Core is written from scratch to make it modular, lightweight, fast, and cross-platform Framework. It includes the core features that are required to run a basic .NET Core app. Other features are provided as NuGet packages, which you can add it in your application as needed. In this way, the .NET Core application speed up the performance, reduce the memory footprint and becomes easy to maintain.

Why .NET Core? 

There are some limitations with the .NET Framework. For example, it only runs on the Windows platform. Also, you need to use different .NET APIs for different Windows devices such as Windows Desktop, Windows Store, Windows Phone, and Web applications. In addition to this, the .NET Framework is a machine-wide framework. Any changes made to it affect all applications taking a dependency on it. Learn more about the motivation behind .NET Core .

Today, it's common to have an application that runs across devices; a backend on the web server, admin front-end on windows desktop, web, and mobile apps for consumers. So, there is a need for a single framework that works everywhere. So, considering this, Microsoft created .NET Core. The main objective of .NET Core is to make .NET Framework open-source, cross-platform compatible that can be used in a wide variety of verticals, from the data center to touch-based devices.

Overview of ASP.NET Core

ASP.NET Core is a cross-platform, high-performance, open-source framework for building modern, cloud-enabled, Internet-connected apps.

With ASP.NET Core, you can:

  • Use your favorite development tools on Windows, macOS, and Linux.
  • Deploy to the cloud or on-premises.

Why choose ASP.NET Core?

Millions of developers use or have used ASP.NET 4.x to create web apps. ASP.NET Core is a redesign of ASP.NET 4.x, including architectural changes that result in a leaner, more modular framework.

ASP.NET Core provides the following benefits:

  • A unified story for building web UI and web APIs.
  • Architected for testability.
  • Razor Pages makes coding page-focused scenarios easier and more productive.
  • Blazor lets you use C# in the browser alongside JavaScript. Share server-side and client-side app logic all written with .NET.
  • Ability to develop and run on Windows, macOS, and Linux.
  • Support for hosting Remote Procedure Call (RPC) services using gRPC.
  • Ability to host on the following:
  • Tooling that simplifies modern web development.

Client-side development

ASP.NET Core integrates seamlessly with popular client-side frameworks and libraries, including BlazorAngularReact, and Bootstrap. For more information, see ASP.NET Core Blazor and related topics under Client-side development.

ASP.NET Core target frameworks

ASP.NET Core 3.x or later can only target .NET Core. Generally, ASP.NET Core is composed of .NET Standard libraries. Libraries written with .NET Standard 2.0 run on any .NET platform that implements .NET Standard 2.0.

There are several advantages to targeting .NET Core, and these advantages increase with each release. Some advantages of .NET Core over .NET Framework include:

  • Cross-platform. Runs on Windows, macOS, and Linux.
  • Improved performance
  • New APIs
  • Open source. 

Characteristics of .NET Core

The following are the major characteristics of .NET Core −

Open source
Cross-platform
Flexible deployment
Command-line tools
Compatible
Modular
The .NET Core Platform
          Open source

  • .NET Core is an open source implementation, using MIT and Apache 2 licenses.

  • .NET Core is a .NET Foundation project and is available on GitHub.

  • As an open source project, it promotes a more transparent development process and promotes an active and engaged community.

  • Cross-platform

  • Application implemented in .NET Core can be run and its code can be reused regardless of your platform target.

  • It currently supports three main operating systems (OS)

    • ➣Windows

    • ➣Linux

    • ➣MacOS

  • The supported Operating Systems (OS), CPUs and application scenarios will grow over time, provided by Microsoft, other companies, and individuals.

  • Flexible deployment

  • There can be two types of deployments for .NET Core applications −

    • ➣Framework-dependent ➣deployment

    • ➣Self-contained deployment

  • With framework-dependent deployment, your app depends on a system-wide version of .NET Core on which your app and third-party dependencies are installed.

  • With self-contained deployment, the .NET Core version used to build your application is also deployed along with your app and third-party dependencies and can run side-by-side with other versions.

  • Command-line tools

  • All product scenarios can be exercised at the command-line.

  • .NET Core is compatible with .NET Framework, Xamarin and Mono, via the .NET Standard Library

  • .NET Core is released through NuGet in smaller assembly packages.

  • .NET Framework is one large assembly that contains most of the core functionalities.

  • .NET Core is made available as smaller feature-centric packages.

  • Compatible

  • This modular approach enables the developers to optimize their app by including just those NuGet packages which they need in their app.

  • Modular

  • The benefits of a smaller app surface area include tighter security, reduced servicing, improved performance, and decreased costs in a pay-for-what-you-use model.

.NET Core Platform contains the following main parts −

  • .NET Runtime − It provides a type system, assembly loading, a garbage collector, native interop and other basic services.

  • Fundamental Libraries − A set of framework libraries, which provide primitive data types, app composition types and fundamental utilities.

  • SDK & Compiler − A set of SDK tools and language compilers that enable the base developer experience, available in the .NET Core SDK.

  • ‘dotnet’ app host − It is used to launch .NET Core apps. It selects the runtime and hosts the runtime, provides an assembly loading policy and launches the app. The same host is also used to launch SDK tools in much the same way.